Replacing backup batteries: Difference between revisions
(Explain purpose of battery and mention portable synths) |
(Add photo of QY70 warning) |
||
| Line 1: | Line 1: | ||
[[File:QY70 backup bettery low.jpg|thumb|300px|right|The [[Yamaha QY70]] displays a "Backup Batt. Low" warning when its internal battery needs replacing.]] | |||
Many older synthesizers from the 90's and earlier contain a small internal battery, sometimes called a "backup battery", used to preserve settings and other data when switched off. For portable synthesizers, this may be ''in addition to'' the main power batteries (e.g. AA batteries). | Many older synthesizers from the 90's and earlier contain a small internal battery, sometimes called a "backup battery", used to preserve settings and other data when switched off. For portable synthesizers, this may be ''in addition to'' the main power batteries (e.g. AA batteries). | ||
Revision as of 23:08, 27 August 2024
Many older synthesizers from the 90's and earlier contain a small internal battery, sometimes called a "backup battery", used to preserve settings and other data when switched off. For portable synthesizers, this may be in addition to the main power batteries (e.g. AA batteries).
Often when buying a used synthesizer, you'll find out that the internal battery has stopped working.
It is really important that you replace this as soon as possible, as they can leak very corrosive acid once past their lifespan. This acid is conductive and can outright kill a synth completely.
Replacing the battery is sometimes as simple as popping the synth open, sliding the battery out (usually a CR2032), and putting a new one in. Other times it may require soldering a new battery, or a holder.
The list of devices will be expanded as more devices and more knowledge gets added to this wiki.
Precautions
- Never EVER apply heat directly to a battery. They are usually made out of lithium ions and are very volatile and toxic. Excessive heat WILL make them explode.
- If using a soldering iron, practice care. These devices can get as hot as 400℃, which WILL burn you if you're not careful.
- Back up anything from the synth you may want to keep. Replacing a battery will most likely erase any user memory.
- Please ensure you are connecting your battery correctly, being mindful of its polarity. Connecting it in reverse may damage your synth, and that would be sad.
Devices that do NOT need battery replacements
Devices with flash memory
Flash memory is a form of non-volatile storage that doesn't need power to prevent data from being lost. Consequently, devices with flash memory typically don't use internal backup batteries.
An example is the Roland-ED SC-8850. There is no internal battery in here - all user memory is stored on flash, which needs to be manually written to.
Devices without memory
Some devices are designed purely for computer use, featuring few if any panel controls, and therefore assume any setup is done by sending MIDI messages from a computer. These devices often have no user memory. Typically, these devices are simpler and cheaper computer-oriented variants of a more expensive synth that has full controls.
Examples include:
- Roland CM series models (TODO: verify), like the Roland CM-32L.
- "ST" variants of Roland Sound Canvas models. (TODO: verify)
- Roland SC-7
- Yamaha MU10 (TODO: verify)
Devices with simple battery replacements
Roland SC-55
Replacing the battery here is as simple as opening the unit up, locating the battery terminal, popping it out and replacing it with another CR2032, being mindful of the polarity.
Devices with complicated battery replacements
Alesis QuadraSynth
Note: this information may only apply to the rackmount module versions - the S4/S4+. Alesis used BR2325 type batteries inside this unit, which are 1.5V like the CR2032 batteries we've known and loved, however they are comprised of a chemical mixture that is rated to run at higher temperatures, in theory lengthening its life span. This is also directly soldered to the board. To replace this, you'll need the following tools:
- Screwdriver (to open the unit up)
- Hot glue (model depending, some elements are stuck down with hot glue and may need reapplication, others have tabs that slide out)
- Soldering iron (to solder a new battery holder in)
- Desoldering kit (to remove the old battery)
- CR2032 battery holder & battery (duh...)

Step 1: Open it up
You'll need a screwdriver for this. Opening it up is fairly easy, just make sure you've disconnected the power beforehand. Once you're in, you may need to pry away some bits of hot glue, depending on the model. It seems like original S4 models use hot glue, while later S4 plus model use removable plastic tabs instead.
Step 2: Remove the old battery
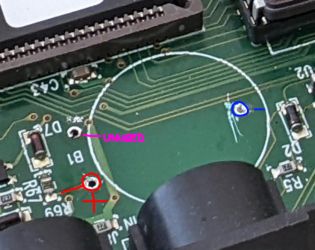
You'll find the old battery on the main board - once removed via a desoldering kit (could be your soldering iron with desoldering braid or whatever), you'll have three holes once finished. Two of the holes will be for polarity, one hole is not used conductively and is only used for structural strength.
Step 3: Soldering a new battery (holder) in
I highly recommend you opt for a holder instead - it will make future replacements much easier, if needed. In any case, solder the plus terminal of the battery holder to the pictured plus terminal on the board, and the minus terminal to the minus terminal on the board. You do not need to solder to the unused port. If you have a hot glue gun handy, you may also use that for structural integrity of the new holder, but make sure it works first to make troubleshooting easier.
Step 4: Button it back up
Once you confirm your synth works as expected, then put it back together as it was and enjoy the prolonged life span your synth now has! Be sure to restore any backed up programs you have made before replacing the battery